A Complete Guide to Linting Go Programs
Linting is the process of identifying and reporting on patterns found in code, with the aim of improving consistency, and catching bugs early in the development cycle. This is particularly useful when working in a team as it helps to make all code look the same no matter who’s writing it, which reduces complexity, and makes the code easier to maintain. In this article, I’ll demonstrate a comprehensive linting setup for Go programs, and talk about the best way to introduce it into an existing project.
Linting code is one of the most basic things you can do to ensure consistent
coding practices in project. Go already ventures farther than most other
programming languages by bundling gofmt, a formatting tool that ensures that
all Go code looks the same, but it only deals with how code is being formatted.
The go vet tool is also available to help with
detecting suspicious constructs that may not be caught by the compile, but it
only catches a limited amount of potential issues.
The task of developing more comprehensive linting tools has been left to the wider community, and this has yielded a mountain of linters, each one with a specific purpose. Prominent examples include:
- unused - Checks Go code for unused constants, variables, functions and types.
- goconst - Find repeated strings that could be replaced by a constant.
- gocyclo - Computes and checks the cyclomatic complexity of functions.
- errcheck - Detect unchecked errors in Go programs.
The problem with having so many standalone linting tools is that you have to download each individual linter yourself and manage their versions. Additionally, running each one of them in sequence may be too slow. Due to these reasons, golangci-lint, a Go linters aggregator that runs linters in parallel, reuses the Go build cache, and caches analysis results for much improved performance on subsequent runs, is the preferred way to setup linting in Go projects.
The golangci-lint project was developed to aggregate and run several
individual linters in parallel for convenience and performance reasons. When you
install the program, you’ll get about 48 linters included (at the time of
writing), and you can proceed to pick and choose which ones are important for
your project. Aside from running it locally during development, you are able to
set it up as part of your continuous integration workflow.
Installing GolangCI-Lint
Use the command below to install golangci-lint locally on any operating
system. Other OS-specific installation options can be found
here.
$ go install github.com/golangci/golangci-lint/cmd/golangci-lint@latestOnce installed, you should check the version that was installed:
$ golangci-lint version
golangci-lint has version v1.40.1 built from (unknown, mod sum: "h1:pBrCqt9BgI9LfGCTKRTSe1DfMjR6BkOPERPaXJYXA6Q=") on (unknown)
You can also view the all the available linters through the following command:
$ golangci-lint help linters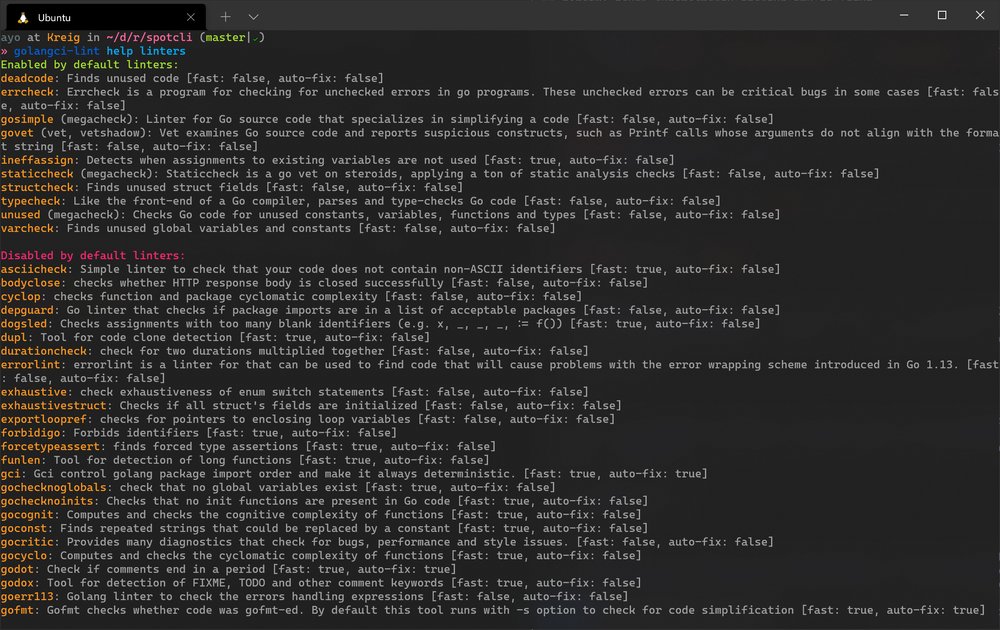
The vast majority of available linters are disabled by default
If you run the enabled linters at the root of your project directory, you may see some errors. Each problem is reported with all the context you need to fix it including a short description of the issue, and the file and line number where it occurred.
$ golangci-lint run # equivalent of golangci-lint run ./...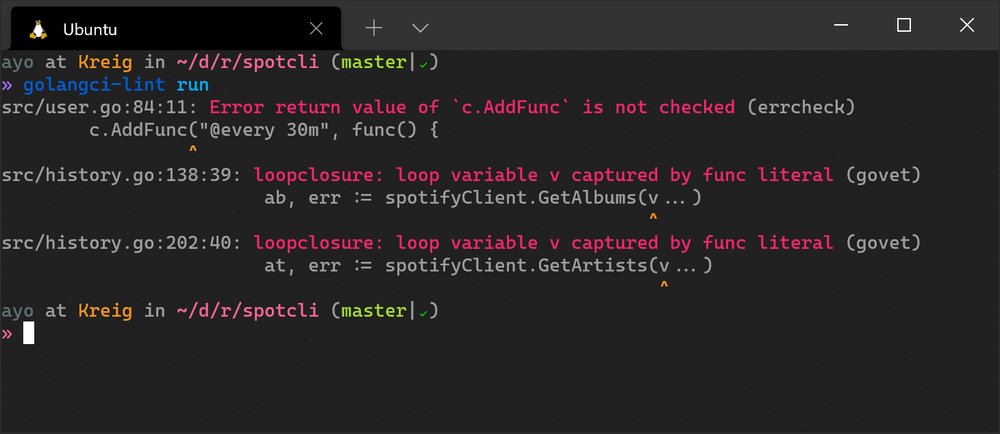
golangci-lint provides a nice output with colors, source code lines and marked identifiers
You can also choose which directories and files to analyse by passing one or more directories or paths to files.
$ golangci-lint run dir1 dir2 dir3/main.goConfiguring GolangCI-Lint
GolangCI-Lint is designed to be as flexible as possible for a wide range of use
cases. The configuration for golangci-lint can be managed through command line
options or a configuration file, although the former has a greater priority over
the latter if both are used at the same time. Here’s an example that uses
command-line options to disable all linters and configure the specific linters
that should be run:
$ golangci-lint run --disable-all -E revive -E errcheck -E nilerr -E gosecYou can also run the presets provided by golangci-lint. Here’s how to find out
about the available presets:
$ golangci-lint help linters | sed -n '/Linters presets:/,$p'
Linters presets:
bugs: asciicheck, bodyclose, durationcheck, errcheck, errorlint, exhaustive, exportloopref, gosec, govet, makezero, nilerr, noctx, rowserrcheck, scopelint, sqlclosecheck, staticcheck, typecheck
comment: godot, godox, misspell
complexity: cyclop, funlen, gocognit, gocyclo, nestif
error: errcheck, errorlint, goerr113, wrapcheck
format: gci, gofmt, gofumpt, goimports
import: depguard, gci, goimports, gomodguard
metalinter: gocritic, govet, revive, staticcheck
module: depguard, gomoddirectives, gomodguard
performance: bodyclose, maligned, noctx, prealloc
sql: rowserrcheck, sqlclosecheck
style: asciicheck, depguard, dogsled, dupl, exhaustivestruct, forbidigo, forcetypeassert, gochecknoglobals, gochecknoinits, goconst, gocritic, godot, godox, goerr113, goheader, golint, gomnd, gomoddirectives, gomodguard, goprintffuncname, gosimple, ifshort, importas, interfacer, lll, makezero, misspell, nakedret, nlreturn, nolintlint, paralleltest, predeclared, promlinter, revive, stylecheck, tagliatelle, testpackage, thelper, tparallel, unconvert, wastedassign, whitespace, wrapcheck, wsl
test: exhaustivestruct, paralleltest, testpackage, tparallel
unused: deadcode, ineffassign, structcheck, unparam, unused, varcheck
Then you can run a preset by passing its name to the --preset or -p flag:
$ golangci-lint run -p bugs -p errorConfiguring golangci-lint for a project is best done through a configuration
file. That way, you’ll be able to configure specific linter options which is not
possible via command-line options. You may specify the configuration file in
YAML, TOML or JSON format, but I recommend sticking with the
YAML format (.golangci.yml or .golangci.yaml) since that’s what
is used on the official documentation pages.
Generally speaking, you should create project-specific configuration in the root of your project directory. The program will automatically look for them in the directory of the file to be linted, and in successive parent directories all the way up to the root directory of the filesystem. This means you can achieve a global configuration for all projects by placing a config file in your home directory (not recommended). This file will be used if a locally scoped config file does not exist.
A sample configuration
file is available
on the golangci-lint website with all supported
options, their description, and
default value. You can use that as a starting point when creating your own
configuration. Keep in mind that some linters perform similar functions so you
need to enable linters deliberately to avoid redundant entries. Here’s the
general
configuration that I
use for my personal projects:
linters-settings:
  errcheck:
    check-type-assertions: true
  goconst:
    min-len: 2
    min-occurrences: 3
  gocritic:
    enabled-tags:
      - diagnostic
      - experimental
      - opinionated
      - performance
      - style
  govet:
    check-shadowing: true
    enable:
      - fieldalignment
  nolintlint:
    require-explanation: true
    require-specific: true

linters:
  disable-all: true
  enable:
    - bodyclose
    - deadcode
    - depguard
    - dogsled
    - dupl
    - errcheck
    - exportloopref
    - exhaustive
    - goconst
    - gocritic
    - gofmt
    - goimports
    - gomnd
    - gocyclo
    - gosec
    - gosimple
    - govet
    - ineffassign
    - misspell
    - nolintlint
    - nakedret
    - prealloc
    - predeclared
    - revive
    - staticcheck
    - structcheck
    - stylecheck
    - thelper
    - tparallel
    - typecheck
    - unconvert
    - unparam
    - varcheck
    - whitespace
    - wsl

run:
  issues-exit-code: 1
Suppressing linting errors
It’s sometimes necessary to disable specific linting issues that crop up in a
file or package. This may be achieved in two main ways: through the nolint
directive, and through exclusion rules in the configuration file. Let’s take a
look at each approach in turn.
The nolint directive
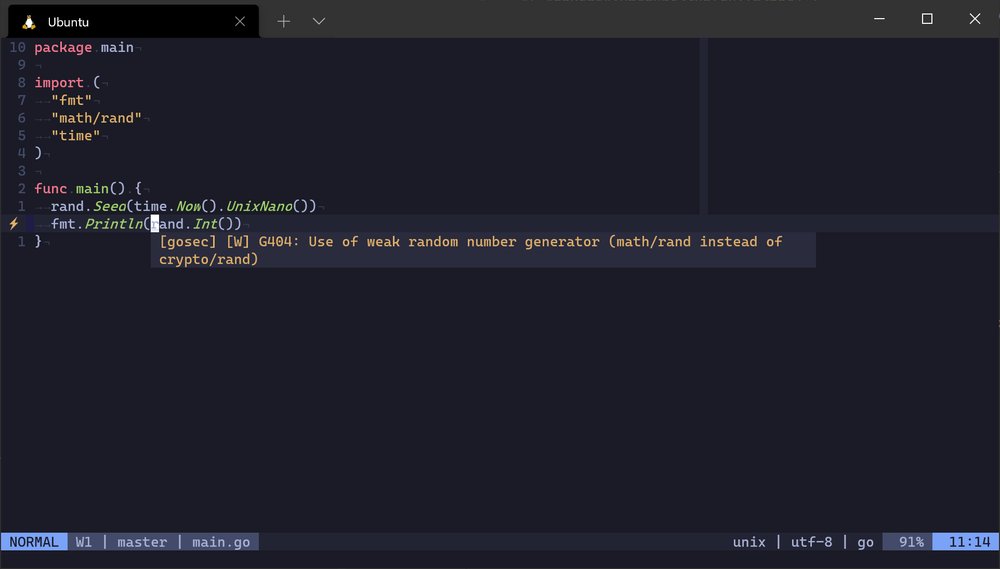
Let’s assume we have the following code that prints a pseudo random integer to the standard output:
package main

import (
	"fmt"
	"math/rand"
	"time"
)

func main() {
	rand.Seed(time.Now().UnixNano())
	fmt.Println(rand.Int())
}
Executing golangci-lint run on this file will produce the following error
provided that the gosec linter is enabled:
$ golangci-lint run -E gosec
main.go:11:14: G404: Use of weak random number generator (math/rand instead of crypto/rand) (gosec)
	fmt.Println(rand.Int())
	            ^
The linter is encouraging the use of the Int method from crypto/rand instead
because it is cryptographically more secure, but it has the tradeoff of a less
friendly API and slower performance. If you’re OK with
the tradeoff of less secure pseudo random numbers for faster speeds, you can
ignore the error by adding a nolint directive on the necessary line:
func main() {
	rand.Seed(time.Now().UnixNano())
	fmt.Println(rand.Int()) //nolint
}This inline usage of nolint causes all the linting issues detected for that
line to be disabled. You can disable the issues from a specific linter by
specifying its name in the directive (recommended). This allows issues raised on
that line by other linters to come through.
func main() {
	rand.Seed(time.Now().UnixNano())
	fmt.Println(rand.Int()) //nolint:gosec
}
When you use a nolint directive at the top of a file, it disables all the
linting issues for that file:
//nolint:govet,errcheck
package main
You can also exclude issues for a block of code (such as a function), by using
a nolint directive at the beginning of the block.
//nolint
func aFunc() {

}
After adding a nolint directive, it is recommended that you add a comment
explaining why it is needed. This comment should be placed on the same line as
the flag itself:
func main() {
	rand.Seed(time.Now().UnixNano())
	fmt.Println(rand.Int()) //nolint:gosec // for faster performance
}
You can enforce the conventions that your team should follow regarding nolint
comments by enabling the nolintlint linter. It can report issues regarding the
use of nolint without naming the specific linter being suppressed, or without
a comment explaining why it was needed.
$ golangci-lint run
main.go:11:26: directive `//nolint` should mention specific linter such as `//nolint:my-linter` (nolintlint)
	fmt.Println(rand.Int()) //nolint
	                        ^
Exclusion rules
Exclusion rules can be specified in the configuration file for a more granular
control on what files are linted, and what issues are reported. For example,
you can disable certain linters from running on test files (_test.go), or you
can disable a linter from producing certain errors project-wide:
issues:
  exclude-rules:
    - path: _test\.go # disable some linters on test files
      linters:
        - gocyclo
        - gosec
        - dupl

    # Exclude some gosec messages project-wide
    - linters:
        - gosec
      text: "weak cryptographic primitive"
Integration with existing projects
When adding golangci-lint to an existing project, you may get a lot of issues
and it may be difficult to fix all of them at once. However, that doesn’t mean
that you should abandon the idea of linting your project for this reason. There
is a new-from-rev setting that allows you to show only new issues created
after a specific git revision which makes it easy to lint new code only until
adequate time can be budgeted to fix older issues. Once you find the revision
you want to start linting from (with git log), you can specify it in your
configuration file as follows:
issues:
  # Show only new issues created after git revision: 02270a6
  new-from-rev: 02270a6
Integrating golangci-lint in your editor
GolangCI-Lint supports integrations with several editors in order to get quick
feedback. In Visual Studio Code, all you need
to do is install the
Go extension,
and add the following lines to your settings.json file:
{
  "go.lintTool":"golangci-lint",
  "go.lintFlags": [
    "--fast"
  ]
}
Vim users can integrate golangci-lint with a variety of plugins including
vim-go,
ALE, and
Syntastic. You can also integrate
it with coc.nvim,
vim-lsp, or
nvim.lspconfig with help of
golangci-lint-langserver.
Here’s how I integrated golangci-lint in my editor with coc.nvim. First,
install the language server:
$ go install github.com/nametake/golangci-lint-langserver@latestNext, open the coc.nvim config file with :CocConfig, and add the following
lines:
{
  "languageserver": {
    "golangci-lint-languageserver": {
      "command": "golangci-lint-langserver",
      "filetypes": ["go"],
      "initializationOptions": {
        "command": ["golangci-lint", "run", "--out-format", "json"]
      }
    }
  }
}
Save the config file, then restart coc.nvim with :CocRestart, or open a new
instance of Vim. It should start working as soon as a Go file is open in the
editor.
voila
Refer to the golangci-lint docs for more information on how to integrate it with other editors.
Setting up a pre-commit hook

Running golangci-lint as part of your Git pre-commit hooks is a great way to
ensure that all Go code that is checked into source control is linted properly.
If you haven’t set up a pre-commit hook for your project, here’s how to set one
up with pre-commit, a language-agnostic tool for
managing Git hook scripts.
Install the pre-commit package manager by following the instructions on this
page, then create a .pre-commit-config.yaml
file in the root of your project, and populate it with the following contents:
repos:
-   repo: https://github.com/tekwizely/pre-commit-golang
    rev: v0.8.3 # change this to the latest version
    hooks:
    -   id: golangci-lint
This configuration file extends the
pre-commit-golang repository
which supports various hooks for Go projects. The golangci-lint hook targets
staged files only, which is handy for when introducing golangci-lint to an
existing project so that you don’t get overwhelmed with so many linting issues
at once. Once you’ve saved the file, run pre-commit install to set up the git
hook scripts in the current repository.
$ pre-commit install
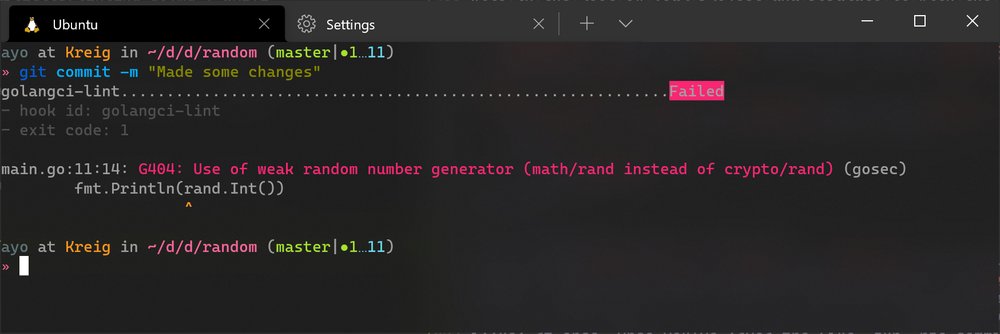
pre-commit installed at .git/hooks/pre-commitOn subsequent commits, the specified hooks will run on all staged .go files
and halt the committing process if errors are discovered. You’ll need to fix all
the linting issues before you’ll be allowed to commit. You can also use the
pre-commit run command if you want to test the pre-commit hook without making
a commit.
Continuous Integration (CI) workflow
Running your project’s linting rules on each pull request prevents code that is
not up to standards from slipping through into your codebase. This can also be
automated by adding golangci-lint to your Continuous Integration process. If you
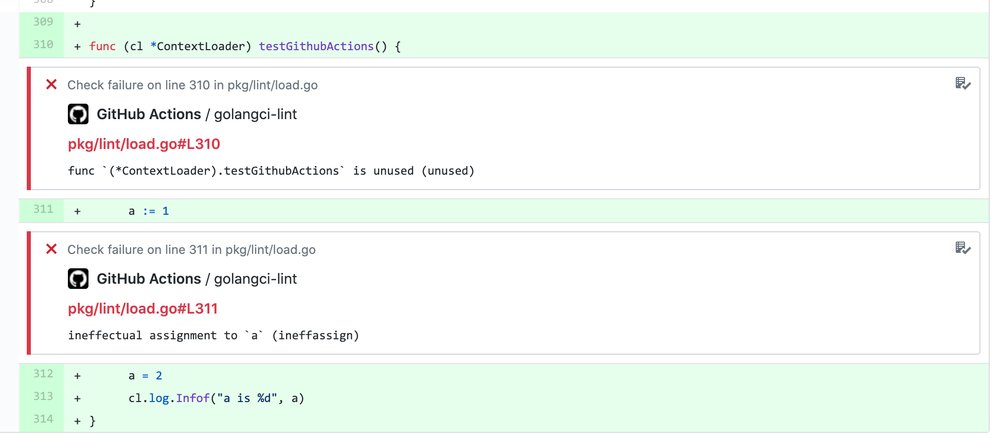
use GitHub Actions, the official
Action should be
preferred over a simple binary installation for performance reasons. After
setting it up, you’ll get an inline display of any reported issues on pull
requests.
During the setup process, ensure to pin the golangci-lint version that is
being used so that it yields consistent results with your local environment.
The project is being actively developed, so updates may deprecate some linters,
or report more errors than previously detected for the same source code.
Conclusion
Linting your programs is a sure fire way to ensure consistent coding practices amongst all contributors to a project. By adopting the tools and processes discussed in this article, you’ll be well on your way to doing just that.
Thanks for reading, and happy coding!