How to build a Custom HTML5 Video Player with JavaScript
This guide will teach you how to create a cross-browser HTML5 video player with JavaScript using the Media and Fullscreen APIs.
Watching and sharing video content is one of the most common uses of the web,
and the way video is embedded on a webpage has evolved over the years.
Nowadays, adding video files to a webpage can be achieved using the <video>
element which works in all modern browsers and supports a variety of video
formats.
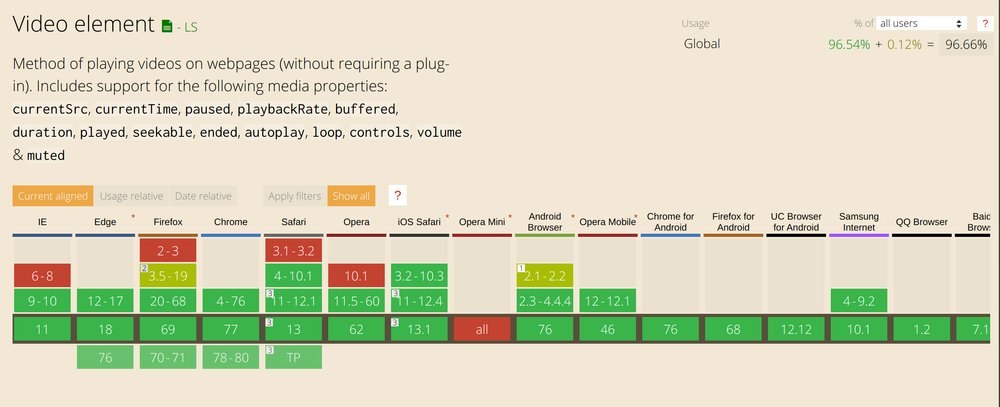
HTML5 video support. See caniuse.com for an up to date table.
The main caveat when using <video> is that the rendered video player will vary
depending on the browser which is not ideal if you want to provide a consistent
user experience. This is why it is useful to build your own interface that
features custom controls instead of using the browser defaults.
In this tutorial, I’ll take you through building a custom video player with JavaScript. The purpose is describe how to leverage the HTML5 Media API in the browser to build an experience that improves on the defaults.
The player we’ll be building in this tutorial will look a lot like the one that is found on YouTube because I think it’s a good idea to replicate some of the functionality that is in something most people are already familiar with.
We won’t be implementing all the features found in the YouTube player as that will make for a longer, more complicated tutorial. However, once you’ve completed this tutorial, I’m confident that you will be able to plug in any new functionality with ease.
You can view a live demo of what we’ll be building, or check out the source code on GitHub.
Prerequistes
You need to have a basic understanding of JavaScript and the DOM to be able to move forward with this tutorial. I also recommend using the latest version of Chrome as some of the features we’ll be adding (such as Picture-in-Picture) work only in Chrome at the time of writing.
Get started
I’ve prepared the starter
files for
this tutorial on GitHub. You need to clone
it to your
machine and open the project directory in your text editor. You will find the
markup and styles for the player in the index.html and style.css files
respectively, as well as the video file that we’ll be testing the player with.
The included index.js file is where we’ll add all the code necessary for the
player to work.
Run npm install in the terminal to install
browser-sync as a development
dependency for starting a web server and automatically refreshing the page
when any of the files change, followed by npm start to open up the project in
your browser on http://localhost:3000.
What has been done so far
At the moment, the video player retains the native browser controls which works
just as you’d expect. The markup for the custom controls have already been
defined in the #video-controls element but they’re hidden by default.
. . .
<div class="video-controls hidden" id="video-controls">
<!-- Custom controls are defined here -->
</div>
. . .
Even though we’re going to implement a custom interface for the controls, it’s a
good idea to retain the controls attribute on the <video> element so that
users that have JavaScript turned off for whatever reason will still have access
to the browser’s native video controls. For everyone else, the native controls
can be hidden easily and replaced with custom controls as will be demonstrated
shortly.
A poster image has also been added to the video, and the preload attribute is
set to metadata which instructs the browser to fetch only the video metadata
(such as duration). To keep things simple, only one source file in the MP4 has been included for the video in MP4 format
because it’s supported by all major browser and is a pretty safe default. See
this
document
for more information on video formats and browser compatibility.
. . .
<video controls class="video" id="video" preload="metadata" poster="poster.jpg">
  <source src="video.mp4" type="video/mp4"></source>
</video>
. . .
Hide the native controls
The first thing we need to do is to hide the default video controls and provide
our own interface once it is determined that the browser supports HTML5 video. Enter the following code snippet into your
index.js file to make that happen:
// Select elements here
const video = document.getElementById('video');
const videoControls = document.getElementById('video-controls');

const videoWorks = !!document.createElement('video').canPlayType;
if (videoWorks) {
  video.controls = false;
  videoControls.classList.remove('hidden');
}
The canPlayType property is how we are able to detect support for a video
format in the browser. To use it, we need to create an instance of the
<video> element and check if it supports the canPlayType method. If it does,
it is safe to assume that HTML5 video is supported so the default controls are
promptly disabled in favour of our custom controls.
The native controls have been replaced by the custom ones
Toggle the playback state
Let’s start with the basics. You should be able to play and pause the video by
clicking on the play button and the icon should change to match the state of the
video. We’ll start by selecting the video and the play button at the top of index.js as follows:
const playButton = document.getElementById('play');Then we’ll create a function that toggles the playback state of the video:
// Add functions here

// togglePlay toggles the playback state of the video.
// If the video playback is paused or ended, the video is played
// otherwise, the video is paused
function togglePlay() {
  if (video.paused || video.ended) {
    video.play();
  } else {
    video.pause();
  }
}
Finally, create an event listener that executes the togglePlay function when
playButton is clicked:
// Add eventlisteners here
playButton.addEventListener('click', togglePlay);
Easy enough right? Test it out by clicking the play button in your browser. It should play and pause the video appropriately.
This actually sets the tone for the rest of the tutorial. We’ll usually select one of the video controls, create a function that implements a specific functionality, then hook it up via an event listener.
Let’s move on to update the play icon depending on the state of the video. This
is the HTML for the playButton:
. . .
<button data-title="Play (k)" id="play">
  <svg class="playback-icons">
    <use href="#play-icon"></use>
    <use class="hidden" href="#pause"></use>
  </svg>
</button>
. . .
We have both the play and pause icons in the <svg> element, but only one is
dispyed at a time while the other is hidden. What we need to do now is toggle
the hidden class on each icon so that the appropriate icon is shown depending on
the state of the video.
First, select the icons at the top of index.js:
const playbackIcons = document.querySelectorAll('.playback-icons use');Next, create the function to update the play button under togglePlay:
// updatePlayButton updates the playback icon and tooltip
// depending on the playback state
function updatePlayButton() {
  playbackIcons.forEach(icon => icon.classList.toggle('hidden'));
}
And finally, add the following event listeners at the bottom:
video.addEventListener('play', updatePlayButton);
video.addEventListener('pause', updatePlayButton);
When the video is played or paused, the updatePlayButton function is executed
which toggles the hidden class on each button. Since we have the hidden
class on the pause icon by default, once the video is played, this icon will be
displayed and the play icon will be hidden. If the video is paused again, the
reverse occurs. You can test this in your browser.
One extra thing to do is updating the text in the tooltip that appears when you
hover over the play button. It reads play (k) by default, but we need to
update it so it reads pause (k) when the video is playing. k is the keyboard
shortcut that we’ll add to play or pause a video later in the tutorial.
Update the updatePlayButton as shown below:
function updatePlayButton() {
  playbackIcons.forEach(icon => icon.classList.toggle('hidden'));

  if (video.paused) {
    playButton.setAttribute('data-title', 'Play (k)')
  } else {
    playButton.setAttribute('data-title', 'Pause (k)')
  }
}
That should set the appropriate text in the tooltip once you hover on the button when the video is playing or paused.
If you’re wondering how the tooltip is shown, here’s the relevant CSS:
. . .
button::before {
  content: attr(data-title);
  position: absolute;
  display: none;
  right: 0;
  top: -50px;
  background-color: rgba(0, 0, 0, 0.6);
  color: #fff;
  font-weight: bold;
  padding: 4px 6px;
  word-break: keep-all;
  white-space: pre;
}

button:hover::before {
  display: inline-block;
}
. . .Show the video duration and time elapsed
It’s necessary to display the length of a video as that’s one of the first things that users would like to see, so we’ll do that next.
Here is the markup for the duration and time elapsed:
<div class="time">
  <time id="time-elapsed">00:00</time>
  <span> / </span>
  <time id="duration">00:00</time>
</div>
Select both controls in your index.js file as follows:
const timeElapsed = document.getElementById('time-elapsed');
const duration = document.getElementById('duration');
We’ll show the total duration of the video once the page loads using the video’s
duration property. This property represents the number of seconds of the
video so we need to convert this number to minutes and seconds before
we can display it. Create a formatTime function that takes in the
time in seconds and converts it to minutes and seconds:
// formatTime takes a time length in seconds and returns the time in
// minutes and seconds
function formatTime(timeInSeconds) {
  const result = new Date(timeInSeconds * 1000).toISOString().substr(11, 8);

  return {
    minutes: result.substr(3, 2),
    seconds: result.substr(6, 2),
  };
};
Next, create an initializeVideo function below formatTime:
// initializeVideo sets the video duration, and maximum value of the
// progressBar
function initializeVideo() {
  const videoDuration = Math.round(video.duration);
  const time = formatTime(videoDuration);
  duration.innerText = `${time.minutes}:${time.seconds}`;
  duration.setAttribute('datetime', `${time.minutes}m ${time.seconds}s`)
}
As shown above, the video’s duration in seconds is rounded to the nearest
integer, formatted to minutes and seconds, and updated on the screen. The
datetime attribute is also updated to a time string that represents the
duration of the video.
Next, let’s hook up the initializeVideo function to the video’s
loadedmetadata event as shown below. This will cause the video duration to be
updated when the video’s metadata has been loaded.
video.addEventListener('loadedmetadata', initializeVideo);
Following that, let’s update the time elapsed when the video is being played. Here’s the function that helps us achieve what we want:
// updateTimeElapsed indicates how far through the video
// the current playback is
function updateTimeElapsed() {
  const time = formatTime(Math.round(video.currentTime));
  timeElapsed.innerText = `${time.minutes}:${time.seconds}`;
  timeElapsed.setAttribute('datetime', `${time.minutes}m ${time.seconds}s`)
}
The event we need to listen for on the video is the timeupdate event. This
event is fired whenever the playback time indicated by the video’s currentTime
property is updated.
video.addEventListener('timeupdate', updateTimeElapsed);The above code ensures that once the video’s currentTime is updated by virtue
of playing the video, the elapsed time is also updated appropriately.
Update the progress bar
The next thing we’ll do is to update the progress bar as the video is being played. Here’s the markup for the progress bar:
. . .
<div class="video-progress">
  <progress id="progress-bar" value="0" min="0"></progress>
  <input class="seek" id="seek" value="0" min="0" type="range" step="1">
  <div class="seek-tooltip" id="seek-tooltip">00:00</div>
</div>
. . .
Here, we have the progress element which is apt for displaying the progress of
any task, while the range input will allow us to scrub through the video quickly
and seamlessly. I’ve styled both elements so that they’re the same width and
height, and the range input is made transparent (except for the thumb which is
the same colour as the value inside the progress bar).
If you’re curious, you can dig into the CSS to find out how I did it. It’s kind of a hack to make the progress bar look like it’s a singular element, but I feel it’s justified for our use case.
The min attribute on both is set to zero, and the value attribute indicates
the current value of both elements. They also need a max attribute which will
be set to the duration of the video in seconds which is from video.duration as
already demonstrated above. We can do this in the initializeVideo function,
but we need to select the elements first:
const progressBar = document.getElementById('progress-bar');
const seek = document.getElementById('seek');
Then update initalizeVideo as shown below:
function initializeVideo() {
  const videoDuration = Math.round(video.duration);
  seek.setAttribute('max', videoDuration);
  progressBar.setAttribute('max', videoDuration);
  const time = formatTime(videoDuration);
  duration.innerText = `${time.minutes}:${time.seconds}`;
  duration.setAttribute('datetime', `${time.minutes}m ${time.seconds}s`)
}
Now, the range for both the progress element and range input is between zero and
the video duration in seconds as indicated by the min and max attributes on
both elements. This allows us to easily sync the progress bar with the range
input at any point in time as you’ll see.
Let’s go ahead and update the values of the aforementioned elements when the
video is being played so that the progress bar becomes functional. Create a new
updateProgress function below:
// updateProgress indicates how far through the video
// the current playback is by updating the progress bar
function updateProgress() {
  seek.value = Math.floor(video.currentTime);
  progressBar.value = Math.floor(video.currentTime);
}
Then add a new timeupdate event listener on the video element below the first one:
video.addEventListener('timeupdate', updateProgress);Refresh your browser and try it out. You should see the progress bar update as the video is being played.
Skip ahead
Most video players allow you to click on the progress bar to jump to a particular point in the video, and ours is not going to be any different. First, we need to select the tooltip element:
const seekTooltip = document.getElementById('seek-tooltip');Then add a function to display the timestamp in the tooltip element when the cursor is over the progress bar:
// updateSeekTooltip uses the position of the mouse on the progress bar to
// roughly work out what point in the video the user will skip to if
// the progress bar is clicked at that point
function updateSeekTooltip(event) {
  const skipTo = Math.round((event.offsetX / event.target.clientWidth) * parseInt(event.target.getAttribute('max'), 10));
  seek.setAttribute('data-seek', skipTo)
  const t = formatTime(skipTo);
  seekTooltip.textContent = `${t.minutes}:${t.seconds}`;
  const rect = video.getBoundingClientRect();
  seekTooltip.style.left = `${event.pageX - rect.left}px`;
}
This function uses the position of the cursor on the seek element to roughly
work out where in the range input the user is hovering on, and stores the
position in a data-seek attribute while updating the tooltip to reflect the
timestamp at that position.
Hook up the updateSeekTooltip function to the mousemove event on the seek
control to see it the effect in action:
seek.addEventListener('mousemove', updateSeekTooltip);Once the value of seek element is changed either by clicking or dragging
the thumb, we want the video to jump to the time set in the data-seek
attribute. Create a new skipAhead function below updateSeekTooltip:
// skipAhead jumps to a different point in the video when
// the progress bar is clicked
function skipAhead(event) {
  const skipTo = event.target.dataset.seek ? event.target.dataset.seek : event.target.value;
  video.currentTime = skipTo;
  progressBar.value = skipTo;
  seek.value = skipTo;
}
This function will be executed when the value of the seek element changes can
be monitored using the input event. We then get the value of the data-seek
attribute and check if it exists. If it does, we grab the value and update the
video’s elapsed time and the progress bar to that value. If the data-seek
property does not exist (on mobile for example), the value of the seek
element is used instead.
This creates the effect of jumping ahead to a different position in the video.
seek.addEventListener('input', skipAhead);Volume controls
. . .
<div class="volume-controls">
  <button data-title="Mute (m)" class="volume-button" id="volume-button">
    <svg>
      <use class="hidden" href="#volume-mute"></use>
      <use class="hidden" href="#volume-low"></use>
      <use href="#volume-high"></use>
    </svg>
  </button>

  <input class="volume" id="volume" value="1" type="range" max="1" min="0" step="0.01">
</div>
. . .
In the above snippet, you can find markup for all the volume related controls. We have a button that represents the volume icon depending on the state of the video’s volume, and a range input that controls the volume of the video.
The first thing we need to do is update the volume of the video when the value
of the #volume element changes. We also need to update the icon to reflect the
current volume of the video.
As you can see, volume input ranges from 0 to 1, and each step in the input increases the volume by 0.01. It is set this way to make it consistent with the video’s volume property which also ranges from 0 to 1 where 0 is the lowest volume and 1 is the highest.
Go ahead and select the button, icons and input in your index.js file:
const volumeButton = document.getElementById('volume-button');
const volumeIcons = document.querySelectorAll('.volume-button use');
const volumeMute = document.querySelector('use[href="#volume-mute"]');
const volumeLow = document.querySelector('use[href="#volume-low"]');
const volumeHigh = document.querySelector('use[href="#volume-high"]');
const volume = document.getElementById('volume');
Next, create a new updateVolume function to update the volume as soon as the
volume input is changed:
// updateVolume updates the video's volume
// and disables the muted state if active
function updateVolume() {
  if (video.muted) {
    video.muted = false;
  }

  video.volume = volume.value;
}
And hook it up to the volume element as follows:
volume.addEventListener('input', updateVolume);At this point, you will notice the volume decrease when you slide the range to the left, and vice versa. We need to add another function to update the icon whenever the volume changes:
// updateVolumeIcon updates the volume icon so that it correctly reflects
// the volume of the video
function updateVolumeIcon() {
  volumeIcons.forEach(icon => {
    icon.classList.add('hidden');
  });

  volumeButton.setAttribute('data-title', 'Mute (m)')

  if (video.muted || video.volume === 0) {
    volumeMute.classList.remove('hidden');
    volumeButton.setAttribute('data-title', 'Unmute (m)')
  } else if (video.volume > 0 && video.volume <= 0.5) {
    volumeLow.classList.remove('hidden');
  } else {
    volumeHigh.classList.remove('hidden');
  }
}
When this function executed, all the icons are hidden then one of them is displayed depending on which condition evaluates to true.
We can run updateVolumeIcon each time the volume changes by listening for the
volumechange event as follows:
video.addEventListener('volumechange', updateVolumeIcon);This is what you should get in your browser after making this change:
One more thing we need to add is the ability to mute and unmute the video by
clicking on the volume icon. We’ll create a new toggleMute function for this
purpose:
// toggleMute mutes or unmutes the video when executed
// When the video is unmuted, the volume is returned to the value
// it was set to before the video was muted
function toggleMute() {
  video.muted = !video.muted;

  if (video.muted) {
    volume.setAttribute('data-volume', volume.value);
    volume.value = 0;
  } else {
    volume.value = volume.dataset.volume;
  }
}
Then run the function when the volumeButton is clicked:
volumeButton.addEventListener('click', toggleMute);This function toggles the state of the muted property on the video to true or
false. When the video is muted, the volume is stored in a data-volume
attribute on the volume element, so that when the video is unmuted, we can
restore the state of the volume to its previous value.
Here’s how that looks in practice:
Click the video to play or pause it
In many video player applications, clicking on the video itself is often a quicker way to play or pause the video so let’s make that possible in our player.
All we need to do is add listen for the click event on the video and run the togglePlay function when the event fires:
video.addEventListener('click', togglePlay);While this works, let’s make it more interesting by adding a bit of feedback when you play or pause a video by clicking on it just like the way it’s done on YouTube or Netflix.
Here’s the HTML for our animation:
. . .
<div class="playback-animation" id="playback-animation">
  <svg class="playback-icons">
    <use class="hidden" href="#play-icon"></use>
    <use href="#pause"></use>
  </svg>
</div>
. . .
And here’s the relevant CSS:
.playback-animation {
  pointer-events: none;
  position: absolute;
  top: 50%;
  left: 50%;
  margin-left: -40px;
  margin-top: -40px;
  width: 80px;
  height: 80px;
  border-radius: 80px;
  background-color: rgba(0, 0, 0, 0.6);
  display: flex;
  justify-content: center;
  align-items: center;
  opacity: 0;
}
By default, the .playback-animation element is made completely transparent
using the opacity property. To replicate the animation from YouTube, we’ll
make use of the Web Animation
API to
animate the opacity and scale of this element.
Select it first at the top of index.js:
const playbackAnimation = document.getElementById('playback-animation');Then create the following function below the all other functions in index.js:
// animatePlayback displays an animation when
// the video is played or paused
function animatePlayback() {
  playbackAnimation.animate([
    {
      opacity: 1,
      transform: "scale(1)",
    },
    {
      opacity: 0,
      transform: "scale(1.3)",
    }], {
    duration: 500,
  });
}
The animate method takes in an array of keyframe objects and an options object where you can control the duration of the animation amongst other things.
Now, add a second the click event listener on the video:
video.addEventListener('click', animatePlayback);The effect is that you now see a short animation when you play or pause the video by clicking on it.
Full-screen video
Next, let’s make the full-screen button functional. To make the video
full-screen (including the controls) we have to select the .video-container
element and ask the browser to place it (and its descendants) in full-screen.
Select both the button and video container in your index.js file:
const fullscreenButton = document.getElementById('fullscreen-button');
const videoContainer = document.getElementById('video-container');
Then create a new toggleFullScreen function:
// toggleFullScreen toggles the full screen state of the video
// If the browser is currently in fullscreen mode,
// then it should exit and vice versa.
function toggleFullScreen() {
  if (document.fullscreenElement) {
    document.exitFullscreen();
  } else if (document.webkitFullscreenElement) {
    // Need this to support Safari
    document.webkitExitFullscreen();
  } else if (videoContainer.webkitRequestFullscreen) {
    // Need this to support Safari
    videoContainer.webkitRequestFullscreen();
  } else {
    videoContainer.requestFullscreen();
  }
}
And add a click event listener on the fullScreenButton as shown below:
fullscreenButton.onclick = toggleFullScreen;The toggleFullScreen function checks if the document is in full-screen mode
first, if so it exits back to window mode. Otherwise, it places the
videoContainer element in full-screen.
One more thing we need to do in this section is update the full-screen icon and the text in the tooltip that appears when you hover on the button. First, select the icons:
const fullscreenIcons = fullscreenButton.querySelectorAll('use');Then create a function to update the button when the videoContainer goes in and
out of full-screen mode:
// updateFullscreenButton changes the icon of the full screen button
// and tooltip to reflect the current full screen state of the video
function updateFullscreenButton() {
  fullscreenIcons.forEach(icon => icon.classList.toggle('hidden'));

  if (document.fullscreenElement) {
    fullscreenButton.setAttribute('data-title', 'Exit full screen (f)')
  } else {
    fullscreenButton.setAttribute('data-title', 'Full screen (f)')
  }
}
Finally, assign updateFullscreenButton to the onfullscreenchange event
handler on the videoContainer element:
videoContainer.addEventListener('fullscreenchange', updateFullscreenButton);And it works as expected! Test it in your browser or see the GIF below.
Add Picture-In-Picture support
The Picture-in-Picture (PiP) API allows users to watch videos in a floating window (always on top of other windows) so they can keep an eye on what they’re watching while interacting with other sites, or applications.
At this point in time, this API is only supported in a handful browsers so we have to use feature detection to hide the PiP button in browsers that do not support it so that users don’t see a button that they can’t use.
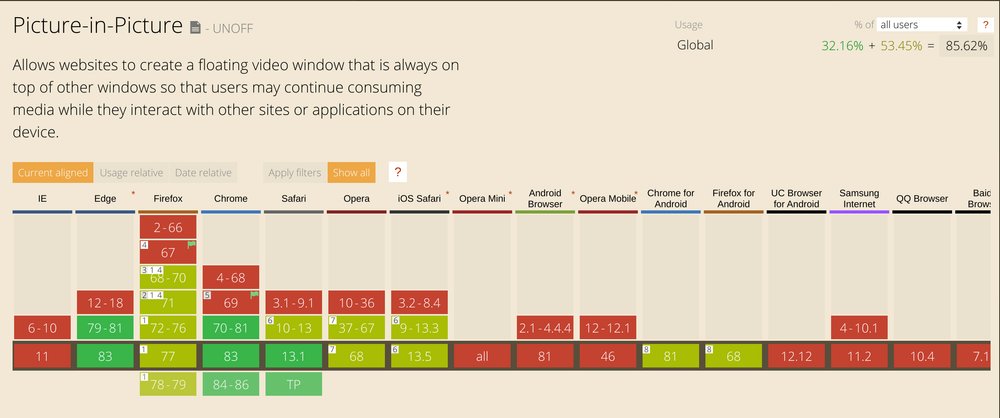
See caniuse.com for the up to date table
Here’s the code that helps us achieve that. Add it below the other event listeners.
document.addEventListener('DOMContentLoaded', () => {
  if (!('pictureInPictureEnabled' in document)) {
    pipButton.classList.add('hidden');
  }
});
As we have been doing throughout this tutorial, we need to select the relevant control first:
const pipButton = document.getElementById('pip-button')Then create the function that toggles Picture-in-Picture mode:
// togglePip toggles Picture-in-Picture mode on the video
async function togglePip() {
  try {
    if (video !== document.pictureInPictureElement) {
      pipButton.disabled = true;
      await video.requestPictureInPicture();
    } else {
      await document.exitPictureInPicture();
    }
  } catch (error) {
    console.error(error)
  } finally {
    pipButton.disabled = false;
  }
}
I’ve made the togglePip function asynchronous so that we can catch errors in
case the requestPictureInPicture() method rejects, which can happen for a
number of reasons. In a real word app, you may want to show an error message to
the user instead of logging it to the console.
Next, listen for the click event on the pipButton and add the togglePip
function as the handler for the event.
pipButton.addEventListener('click', togglePip);Now, clicking the pipButton should enter or exit Picture-in-Picture mode. You
can also close the PiP window by clicking on the close button in the top right.
Toggle the video controls
The video controls take up some space and blocks the user’s view of some of the content. It is better to hide them when they are not in use, and show them again when hovering over the video.
Write the two functions below for this purpose:
// hideControls hides the video controls when not in use
// if the video is paused, the controls must remain visible
function hideControls() {
  if (video.paused) {
    return;
  }

  videoControls.classList.add('hide');
}

// showControls displays the video controls
function showControls() {
  videoControls.classList.remove('hide');
}
What we want to do here is hide the controls when the cursor leaves the video
interface. But we want to make sure the controls are always shown when the video
is paused, hence the conditional in hideControls().
To achieve this, we’ll use the onmouseenter and onmouseleave event handlers
on both the video element and the videoControls as shown below:
video.addEventListener('mouseenter', showControls);
video.addEventListener('mouseleave', hideControls);
videoControls.addEventListener('mouseenter', showControls);
videoControls.addEventListener('mouseleave', hideControls);
Add keyboard shortcuts
The last feature we’ll add to our player is the ability to use the keyboard to control the video playback. It’s really just a matter of running the functions we’ve already written when a specific key is pressed. The shortcuts we’ll implement here are as follows:
k: Play or pause the videom: Mute or unmute the videof: Toggle fullscreenp: Toggle Picture-in-Picture mode
What we’ll do here is listen for the keyup event on the document, detect the
key that was pressed and run the relevant functions for key.
// keyboardShortcuts executes the relevant functions for
// each supported shortcut key
function keyboardShortcuts(event) {
  const { key } = event;
  switch(key) {
    case 'k':
      togglePlay();
      animatePlayback();
      if (video.paused) {
        showControls();
      } else {
        setTimeout(() => {
          hideControls();
        }, 2000);
      }
      break;
    case 'm':
      toggleMute();
      break;
    case 'f':
      toggleFullScreen();
      break;
    case 'p':
      togglePip();
      break;
  }
}
A switch statement is used above to detect which key was pressed and then
execute the relevant code. The reason hideControls is called after two seconds
is to imitate the behaviour on YouTube where, when using the keyboard shortcut
to play the video, the controls do not hide immediately once the video starts
playing but do so after a short delay.
document.addEventListener('keyup', keyboardShortcuts);Conclusion
There are so many ways to improve the video player but the tutorial was already getting too long so I had to stop here. If you’re interested in extending the functionality of the player, here are some ideas:
- Add support for captions and subtitles.
- Add speed support.
- Add the ability to fast-forward or rewind the video.
- Add ability to choose video resolution (720p, 480p, 360p, 240p).
I hope this tutorial was helpful to you. If you have any questions, please leave a comment below and I’ll get back to you. Don’t forget to checkout the full source code on GitHub.
Thanks for reading, and happy coding!