Build your first JavaScript App — A Random Quote Generator
If you’re learning JavaScript as your first programming language, this tutorial provides a good opportunity to learn how it is used in the real world. It will help you understand how JavaScript, HTML and CSS work together to create applications in the browser.
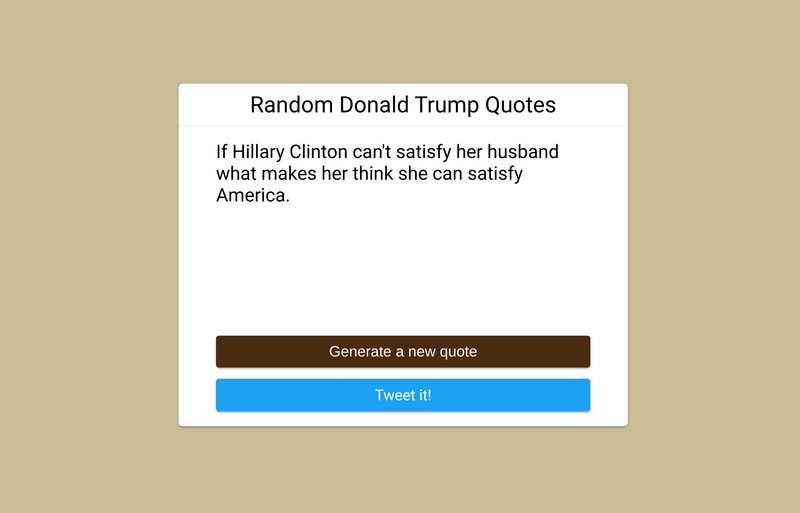
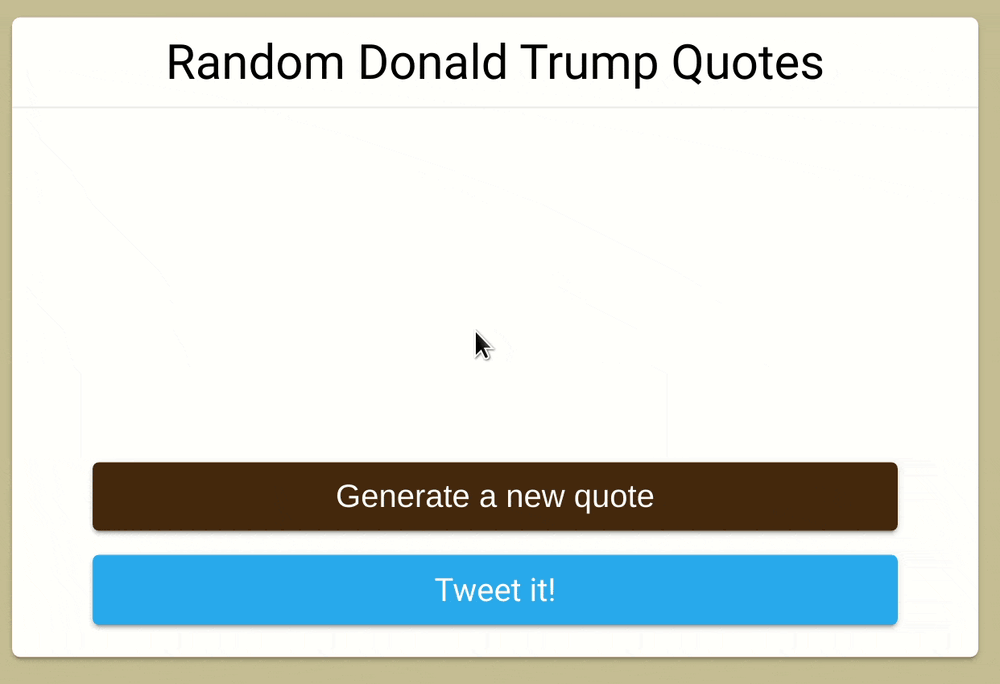
In this article, you will learn how to use JavaScript to build a Random Quote Generator. It’s an application that fetches a new random quote each time a button is pressed and displays it in the browser. Here’s a screenshot of what the finished application looks like:
A live demo can be found here
To complete this tutorial, all you need is a modern web browser (such as Firefox or Chrome) and a working internet connection. If you get stuck, leave a comment below, and I’ll get back to you as soon as I can.
Prerequisites
I assume you have a basic familiarity with HTML and CSS, and it’s also helpful if you know the basics of JavaScript. However, I’ve tried to make the tutorial as accessible as possible even if you’ve never written a single line of JavaScript before.
Getting started
You can find the markup and styles for this project on JSFiddle. Click the Fork button at the top to create your own instance or copy and paste it into a local HTML and CSS file if you prefer.
One of the most basic uses of JavaScript is for making interactive wepbages. This allows the page to change slightly or totally when a user performs an action. JavaScript is used for just about everything these days, including, but not limited to, server infrastructure, desktop and mobile apps, but this is still the quickest way to put to practice what you learn.
If you look at the application in its current state, you will see that it’s really just a static page that doesn’t respond to user interaction. We have two buttons: the first one for fetching a new random quote and displaying it on the page, and second for sharing the quote on Twitter. At the moment, clicking on either button has no effect and that’s because we haven’t written any JavaScript code yet.
Our task is to fetch a new quote when the quote button is clicked and display it to the user. We’ll be making use of the What Does Trump Think API to accomplish this.
Select elements on the page
First off, let’s store store a reference to the quote button in our JavaScript code. Here’s the markup for the quote button in the HTML:
<button type="button" id="js-new-quote" class="new-quote button">
  Generate a new quote
</button>
The presence of classes and IDs on an element is not only useful for applying styles to the element, but also for referencing them in JavaScript code. There are many ways to select an element with JavaScript but I will show you a way that has some similarities to how you’d do it in CSS.
In CSS, you’d do this:
/* when using a class */
.class-name {
  /* styles go here */
}

/* when using an id */
#id-name {
  /* styles go here */
}
In JavaScript, you can select an element with the DOM document.querySelector method shown below:
// Using a class selector
document.querySelector('.class-name')

// Using an id selector
document.querySelector('#id-name')
The document represents the current web page, while querySelector is a DOM
method that references the first element within the document that matches the
specified selector.
Notice that the selector strings are enclosed in single quotes in the above code. You can also use double quotes:
document.querySelector(".class-name")There’s no semantic difference between the single or double quotes for strings in JavaScript. The important thing is to be consistent. I will continue to use single quotes for the remainder of this tutorial because it is the dominant style in the JavaScript community.
Moving on, here’s how to select the quote button in our JavaScript code:
document.querySelector('#js-new-quote')This creates a reference to the quote button on the page. Next, we need to store the reference to this button in a variable. Variables in JavaScript (and other programming languages for that matter) are containers for holding different types of data structures. They give us an easy way to label some data in our program so that it can be easily referenced by other parts of the program.
There are quite a few ways to create variables in JavaScript. You may have seen
uses of the now outdated var keyword.
var name = value;However, a more modern approach is to use const or let which were introduced
in ECMAScript2015 (a.k.a.
ES2015 or ES6) to replace var:
const name = value;
let name = value;
We will use const exclusively in this tutorial and talk about how it’s
different from let and var in a future article.
Naming variables
Variables in JavaScript must have unique names. These names can consist of
letters, numbers, underscores, and dollar signs. However, they cannot start with
numbers (only letters, underscores, and the dollar sign). Variable names are
also case sensitive (meaning ziggy and ZIGGY are different variables) and
they cannot be keywords in the language.
When you declare a variable, you need to assign a value to it. The Equals sign,
=, known as the assignment operator, is what is used to assign values to
variables. Here’s how you declare a variable and assign a value to it in
JavaScript:
const answer = 42;This variable declaration has answer as its name and 42 as its value.
Assignment is always from right to left. This means that all the values on the
right side of the = is evaluated first before the final value is assigned to
the variable on the left side.
const a = 10;
const b = a + 20; // a is resolved to 10 and added to 20 before being assigned to b
Now go ahead and type this into the JavaScript pane in JSFiddle:
const newQuoteButton = document.querySelector('#js-new-quote');This assigns a reference to the quote button to a new variable called
newQuoteButton. Now, we can use the newQuoteButton variable anywhere in our
JavaScript code knowing that it will always refer to the quote button.
By the way, did you notice the presence of a semicolon (;) at the end of the
variable declaration? Although not strictly necessary, the
convention is to always end
statements in JavaScript with a semicolon.
Listen for events on an element
DOM events are signals sent by the browser when specific actions take place on a web page usually as a result of user interaction. Developers can setup their programs to listen for any of these events and perform certain operations when the events are triggered.
In our application, we need to detect a click on the quote button so that we can
fetch a new random quote and display it to the user. We can do this by listening
for the click event on the button through the document.addEventListener
method.
Type this under the newQuoteButton variable declaration:
newQuoteButton.addEventListener('click', getQuote);The addEventListener accepts at least two arguments (the values between the
parenthesis). The first one, click, is the event we want to listen for and the
second one, getQuote, is the name of the function that will be invoked when
the click event is triggered on newQuoteButton.
A function is a block of code defined to perform a specific task. It is used to encapsulate code that we want to reuse many times so we don’t have to go through the trouble of duplicating it. This makes code easier to reason about.
The function keyword is used to declare functions in JavaScript. It is
followed by the name of the function and the code that will be executed when the
function is invoked between the curly braces (a.k.a the function body).
The syntax is as follows:
function name() {
  // body of function
}
The above function can be invoked or called using its name followed by
parentheses, like this: name(). When you invoke a function, it executes the
code defined in its body.
Sometimes, a function will have parameters. These parameters are written between the parentheses after the function name and each one is separated by commas. A parameter is like a variable used to customise the output of a function. You can think of them as placeholders for input values that will be passed to a function when it is invoked. Usually, a function that takes input parameters will perform some operation on them to produce a new value.
function name(a, b) {
  return a + b;
}
The return keyword is used in functions to return the result of the operation
performed within the function. If a function does not explicitly return a
value, it will return undefined.
Back to our code:
newQuoteButton.addEventListener('click', getQuote);In the line of code above, we specified getQuote as the function that needs to
run when the quote button is clicked. This function does not exist yet so we
need to it otherwise the program will throw a ReferenceError which means that
we attempted to access something that does not exist.
In fact, you should be able to see this error in your browser console right now. Use Ctrl+Shift+J or Cmd+Opt+J in Chrome and Ctrl+Shift+K or Cmd+Opt+K in Firefox to open up the console, or use the built-in JSFiddle console on the bottom right.

Let’s fix this error by creating the getQuote function below the first two
lines as shown below:
function getQuote() {
  console.log("quote button was clicked");
}
Here, we created a new function, assigned it the name getQuote wrote some code
to print text to the console in its body. If you open up the browser console and
click the quote button a few times, the text “quote button was clicked” will
be printed once for each time the button was clicked.
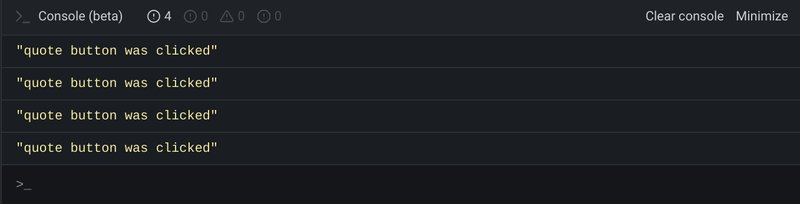
I clicked the button four times, so the text is logged four times
If you click anywhere else on the page outside the quote button, nothing
happens. This is because the event listener is attached only to the quote
button so getQuote is only invoked when it is clicked.
Fetch random quotes using an API
Presently, we are logging some text to the console when the quote button is clicked but what we really need to do is to fetch a random quote and display it on the screen.
One way to do this is to hard-code the quotes into your app and access it from there. Hard coding simply means putting the data that a program relies on inside the program itself. This makes it easy to work with but difficult or impossible to change without modifying the code which is often undesirable.
A better approach is to get the data using an API. This could be an API that we build for ourselves or one that is made by someone else and provided for public used. Most web APIs transfer data in a format called JSON which stands for JavaScript Object Notation.
There are several public APIs that provide random quotes. As mentioned earlier, we’ll be working with the What Does Trump Think API which provides generic Donald Trump quotes.
To use an API effectively, you need to know the URL, HTTP method, query parameters and authentication requirements for receiving the specific data that you need. You will usually find this information in the documentation of the API you wish to use.
For example, the documentation of the What Does Trump Think API specifies that we use the following URL to get a random quote:
https://api.whatdoestrumpthink.com/api/v1/quotes/randomLuckily, this particular API requires no authentication so
we can use it straightaway without signing up for an API
access key. Let’s save this URL endpoint in a variable
above the getQuote function declaration:
const endpoint = 'https://api.whatdoestrumpthink.com/api/v1/quotes/random';Next, we need to make a request to the API to grab a
random quote. To do so, we will make use of a built-in mechanism in the browser
called
fetch.
Modify the getQuote function to look like this:
async function getQuote() {
  // The `try` block executes the statements within it as usual.
  // If an exception is thrown, the statements defined in
  // the `catch` block will be executed.
  // Learn more here: https://javascript.info/try-catch
  try {
    const response = await fetch(endpoint)
    // If the response is not 200 OK...
    if (!response.ok) {
      // ...throw an error. This causes control flow
      // to skip to the `catch` block below.
      throw Error(response.statusText)
    }

    const json = await response.json();
    console.log(json);
  } catch (err) {
    console.log(err)
    alert('Failed to fetch new quote');
  }
}
There’s a lot to unpack here. First, we see the appearance of the async
keyword before the function. This is used to specify that the function is
asynchronous meaning that you can use the await keyword in the function to
pause the function while waiting for an operation to complete. If you try to use
await in a non async function, the JavaScript engine will throw an error.
Inside our getQuote function, we have a try block and a catch block. If an
error occurs within the try block, the code inside the catch block will be
executed. This is a control flow mechanism that allows us to respond
appropriately if an error (expected or otherwise) occurs while performing an
operation.
const response = await fetch(endpoint)The simplest use of fetch takes a single argument — the url to the resource
you want to fetch — and returns what is known as a
Promise.
A Promise represents the eventual success or failure of an operation and the
await keyword is used to pause the function until a promise is resolved.
The response to the fetch request (after it is resolved) is stored in the
response variable. If the request is successful, a 200
OK response will be received. If not, it means the
request failed for some reason.
if (!response.ok) {
  throw Error(response.statusText)
}
This part of the code checks if the response is 200 OK. If it’s not, an error object
is thrown using the throw keyword. If this happens, or if an error occurs at
any other point inside the try block, control moves immediately to the catch
block and an alert is shown to the user while the actual error is logged to the
console for inspection.
Assuming the response was indeed 200 OK, the if block will be skipped and the
line after it will be executed.
const json = await response.json();Here, the response.json method reads the response body to completion and
parses the response as JSON. The
reason we use await here again is because the json() method returns a
promise. If the promise is resolved successfully, the JSON object will be stored in the json variable and
logged to the console. Otherwise, if an error occurs while parsing the JSON, the catch block will execute
just as before.
Try it out by click the quote button a few times. You should see the JSON object received from the What Does Trump Think in the browser console each time.
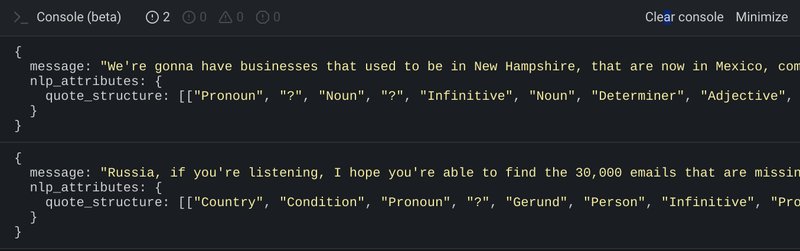
If you examine the JSON object, you will see that the quote is
stored in the message property and it contains a different quote each time.
The object also contains the nlp_attributes property which we don’t need for
this tutorial. We can access the value in the message key using dot notation
like this: json.message. If we wanted to access the value of the
nlp_attributes key, we would use json.nlp_attributes.
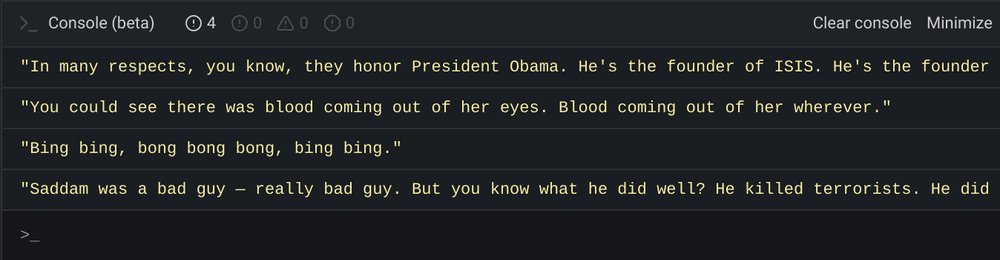
Within the getQuote function, change the following line:
console.log(json);to
console.log(json.message);Now, click the quote button a few times once more. You will see that only the quote is logged to the console, instead of the whole JSON object.
You can also try to disable your internet connection and try clicking the button again. This time, an alert will be displayed in the window and an error logged to the console.
Display the quote on the page
Now that we are able to fetch random quotes successfully from What Does Trump Think, it’s time to display it within the application interface.
Let’s create a new function for this purpose. Type this just below the
getQuote function:
function displayQuote(quote) {
  const quoteText = document.querySelector('#js-quote-text');
  quoteText.textContent = quote;
}
The displayQuote function is where the code that displays the quote to the
user is placed. It takes one parameter, quote which is the quote that will be
displayed on the page.
In the function body, we save a reference to the element with the id of
‘js-quote-text’ in the quoteText variable. Next, we assign the textContent
property of the quoteText element to the quote we want to display.
This has the effect of replacing the contents of the quoteText element with a
single text node that contains the quote received from the What Does Trump Think
API.
At this point, if you click the quote button again, nothing is shown on
the page. This is because while we have defined the displayQuote function, we
have not yet invoked it from anywhere and we have to do so before the code in
the body of the function will be executed.
So go back to the getQuote function and change the following line:
console.log(json.message);to
displayQuote(json.message);Now, each time a new quote is received from the API, the
displayQuote function is summoned and the quote is passed to it as input. The
code we wrote in the body of displayQuote is then executed resulting in the
quote being displayed on the page.
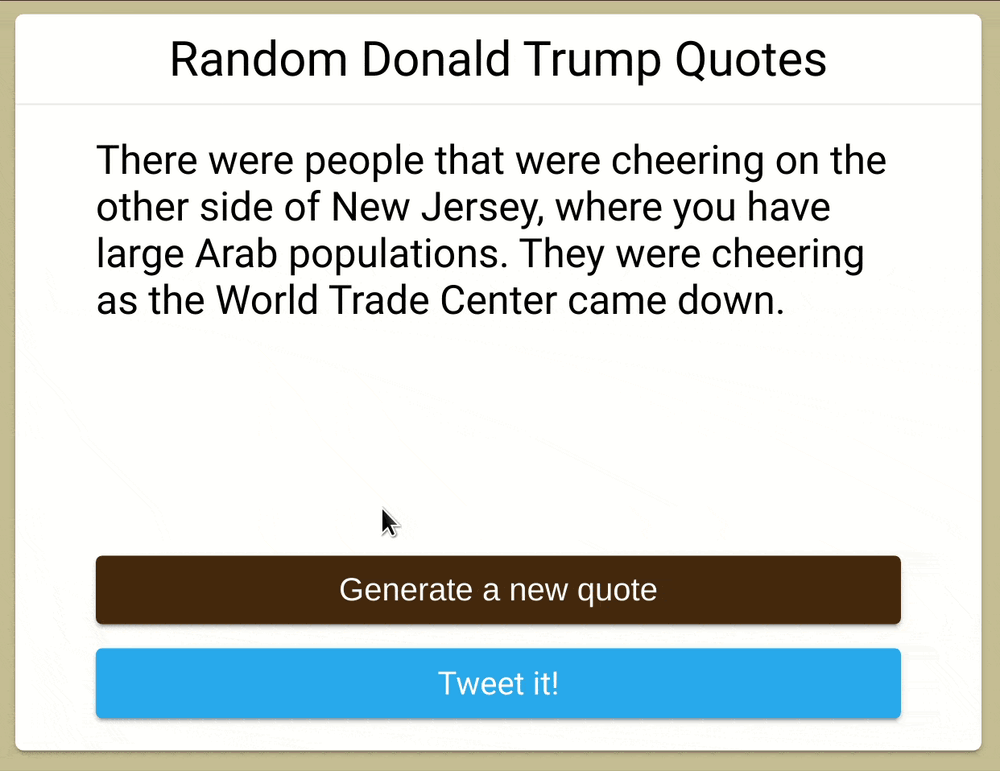
Try it out by clicking the quote button a few times. You will see a new random quote displayed on the page each time.
Show a loading indicator
Let’s take our application to the next level by displaying a loading indicator each time a new quote is requested. This signifies to a user that an operation is currently in progress. We’ll also disable the quote button so that only one request can be made at a time.
The loading indicator we’ll be using is taken from this website. If you click the Source link at the top of the page, you will see the markup and styles used to produce each effect. If you don’t like the particular spinner I selected, you can replace it with one of the other options.
Add the following code in the HTML pane in between the two
<section> elements:
<div id="js-spinner" class="spinner hidden">
  <div class="rect1"></div>
  <div class="rect2"></div>
  <div class="rect3"></div>
  <div class="rect4"></div>
  <div class="rect5"></div>
</div>
Next, place the following code below all the other styles in the CSS pane:
.spinner {
  margin: 10px auto;
  width: 50px;
  height: 40px;
  text-align: center;
  font-size: 10px;
}

.spinner.hidden {
  visibility: hidden;
}

.spinner > div {
  background-color: #333;
  height: 100%;
  width: 6px;
  display: inline-block;

  -webkit-animation: sk-stretchdelay 1.2s infinite ease-in-out;
  animation: sk-stretchdelay 1.2s infinite ease-in-out;
}

.spinner .rect2 {
  -webkit-animation-delay: -1.1s;
  animation-delay: -1.1s;
}

.spinner .rect3 {
  -webkit-animation-delay: -1.0s;
  animation-delay: -1.0s;
}

.spinner .rect4 {
  -webkit-animation-delay: -0.9s;
  animation-delay: -0.9s;
}

.spinner .rect5 {
  -webkit-animation-delay: -0.8s;
  animation-delay: -0.8s;
}

@-webkit-keyframes sk-stretchdelay {
  0%, 40%, 100% { -webkit-transform: scaleY(0.4) }
  20% { -webkit-transform: scaleY(1.0) }
}

@keyframes sk-stretchdelay {
  0%, 40%, 100% {
    transform: scaleY(0.4);
    -webkit-transform: scaleY(0.4);
  }  20% {
    transform: scaleY(1.0);
    -webkit-transform: scaleY(1.0);
  }
}
The above styles are used to produce the animation effect. Understanding how it works is not crucial to this tutorial, but if you wish to learn about CSS animations, you can start here.
At the moment, the loading indicator is hidden from view due to the presence of
the hidden class is styled with visibility: hidden;. When the quote button
is clicked and the getQuote function is invoked, we need to remove the
hidden class and add it back again once the request is completed regardless of
whether it fails or succeeds. Simultaneosly, we’ll disable the button and
enable it again.
First, select the spinner element at the very top of the JavaScript pane:
const spinner = document.querySelector('#js-spinner');Next, modify the getQuote function as shown below:
async function getQuote() {
  // remove the "hidden" class on the spinner
  spinner.classList.remove('hidden');
  // disable the quote button
  newQuoteButton.disabled = true;

  try {
    const response = await fetch(endpoint)
    if (!response.ok) {
      throw Error(response.statusText);
    }
    const json = await response.json();
    displayQuote(json.message);
  } catch {
    alert('Failed to fetch new quote');
  } finally {
    // enable the quote button
    newQuoteButton.disabled = false;
    // add the "hidden" class back again
    spinner.classList.add('hidden');
  }
}
At the top of the function, the hidden class is taken off the spinner and the
quote button is disabled. Once the operation completes, they need to be returned
to their original state. This is done in the finally block. It’s meant for
code that needs to execute regardless of whether an operation succeeds or fails.
The styles for the button in its disabled state (between lines 84-88 in the
CSS pane) is shown below. It’s what gives the greyed out look when
the disabled attribute is added to the button.
84.new-quote:disabled {
85  background-color: #cccccc;
86  color: #666666;
87  cursor: not-allowed;
88}
Here’s the result:
Tweet out a quote
To complete the application, we need to be able to tweet out each quote that is displayed on the page. We already have the tweet button on the page (actually a link styled to look like a button) but clicking it does not have any effect.
<a class="twitter button" id="js-tweet" target="_blank" rel="noopener noreferrer">Tweet it!</a>This is because the anchor tag does not have an href attribute so it does not
link to anywhere. Our task is to dynamically set this attribute so that it will
link to Twitter’s Share page and pre-populate the text input with the quote we
want to tweet out.
First, select the tweet button at the top of your JavaScript code:
const twitterButton = document.querySelector('#js-tweet');Next, create the setTweetButton function shown below after displayQuote:
function setTweetButton(quote) {
  twitterButton.setAttribute('href', `https://twitter.com/share?text=${quote} - Donald Trump`);
}
The href attribute is set on the tweet button using the setAttribute method
which takes two arguments: The attribute we want to set (href) and the value
of the attribute (https://twitter.com/share?text=${quote} - Donald Trump).
You might be wondering why I used backticks for the second argument instead of
single quotes. This is because we want to insert the value of the quote
parameter into Twitter’s share tweet URL. To achieve this, we’ll
use template
literals
which allow the embedded expressions.
So if the value of quote is “Today, Iraq is Harvard for terrorism.” for example,
${quote} will be replaced by the value and the string becomes
https://twitter.com/share?text=Today, Iraq is Harvard for terrorism. - Donald
Trump
This is how we are able to dynamically set the href attribute of the tweet
button to a URL that is pre-populated with any quote that is received from the
What Does Trump Think API.
Let’s call the setTweetButton function in the getQuote() function just below
the call to displayQuote()
displayQuote(json.message);
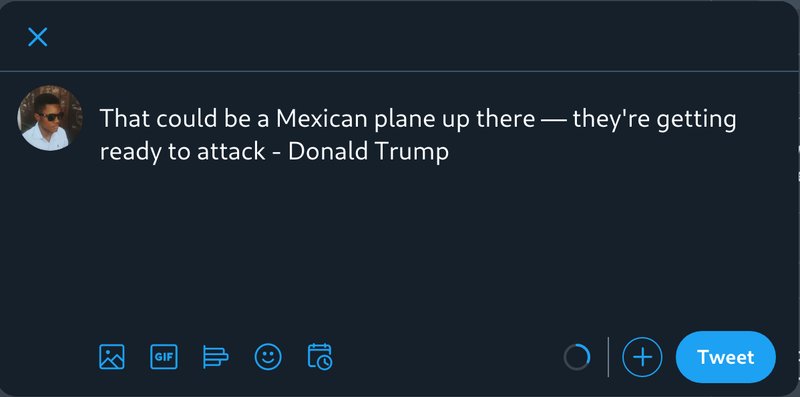
setTweetButton(json.message);Clicking the tweet button now should open Twitter’s share tweet page and you will see that the contents of the text box is pre-populated with the quote.
One more thing…
If you refresh the page, no quotes are displayed and the tweet button does not work. We can fix this easily by adding the following line to the end of the program:
getQuote();This invokes getQuote once when the page is loaded so that a quote is fetched
and displayed to the user immediately. Subsequently, new quotes will be
requested and displayed on demand.
Conclusion
In this tutorial, we discovered how JavaScript can be used to create an interactive web application. I hope you learnt a lot from it. You can get additional practice by developing your own quote generator from scratch using a different API such as this one.
If you have a question or feedback about this tutorial, leave a comment below and I’ll respond to it as soon as possible. You can also subscribe to my newsletter below to receive tutorials just like this one in your inbox twice a month.
Thanks for reading, and happy coding!